Cropping an image
Digital editors are used to crop images. Cropping creates a new image by selecting a desired rectangular portion from the image being cropped. The unwanted part of the image is discarded. Image cropping does not reduce the resolution of the area cropped. Best results are obtained when the original image has a high resolution. A primary reason for cropping is to improve the image composition in the new image.
 Uncropped image from camera | Lilly cropped from larger image |
Histogram
Image editors have provisions to create an image histogram of the image being edited. The histogram plots the number of pixels in the image (vertical axis) with a particular brightness value (horizontal axis). Algorithms in the digital editor allow the user to visually adjust the brightness value of each pixel and to dynamically display the results as adjustments are made. Improvements in picture brightness and contrast can thus be obtained.
| |  Histogram of Sunflower image |
Noise removal
Image editors may feature a number of algorithms which can add or remove noise in an image. JPEG artifacts can be removed; dust and scratches can be removed and an image can be de-speckled. Noise removal merely estimates the state of the scene without the noise and is not a substitute for obtaining a "cleaner" image. Excessive noise reduction leads to a loss of detail, and its application is hence subject to a trade-off between the undesirability of the noise itself and that of the reduction artifacts.
Noise tends to invade images when pictures are taken in low light settings. A new picture can be given an 'antiquated' effect by adding uniform monochrome noise.
Removal of unwanted elements
Most image editors can be used to remove unwanted branches, etc, using a "clone" tool. Removing these distracting elements draws focus to the subject, improving overall composition.
 Notice the branch in the original |  The eye is drawn to the center of the globe |
Selective color change
Some image editors have color swapping abilities to selectively change the color of specific items in an image, given that the selected items are within a specific color range.
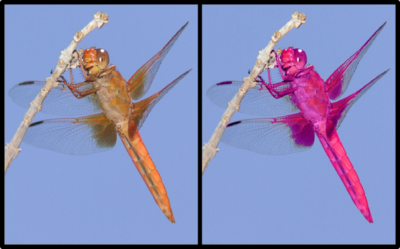
An example of selective color change, the original is on the left.

The original car is on the right.
Image orientation
 Image orientation: left–original; center–30° CCW rotation; right–flopped . |
Image editors are capable of altering an image to be rotated in any direction and to any degree.
Mirror images can be created and images can be horizontally
flipped or vertically
flopped. A small rotation of several
degrees is often enough to level the
horizon, correct
verticality (of a building, for example), or both. Rotated images usually require
cropping afterwards, in order to remove the resulting gaps at the image edges.
Perspective correction and distortion
-
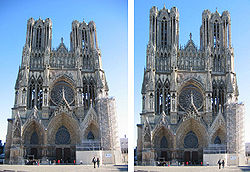 Perspective correction: left–original, uncorrected right–perspective distortion removed. |
Some image editors allow the user to
distort (or "transform") the shape of an image. While this might also be useful for special effects, it is the preferred method of correcting the typical
perspective distortion which results from photographs being taken at an oblique angle to a
rectilinear subject. Care is needed while performing this task, as the image is reprocessed using
interpolation of adjacent pixels, which may reduce overall image
definition. The effect mimics the use of a
perspective correction lens, which achieves a similar correction
in-camera without loss of definition.
Lens correction
Photo manipulation packages have functions to correct images for various lens distortions including pincushion, fisheye and barrel distortions. The corrections are in most cases subtle, but can improve the appearance of some photographs.
Sharpening and softening images
Graphics programs can be used to both sharpen and blur images in a number of ways, such as unsharp masking or deconvolution.[1] Portraits often appear more pleasing when selectively softened (particularly the skin and the background) to better make the subject stand out. This can be achieved with a camera by using a large aperture, or in the image editor by making a selection and then blurring it. Edge enhancement is an extremely common technique used to make images appear sharper, although purists frown on the result as appearing unnatural.
Selecting and merging of images
Many graphics applications are capable of merging one or more individual images into a single file. The orientation and placement of each image can be controlled. The two images shown here were once individual studio portraits.
When selecting a raster image that is not rectangular, it requires separating the edges from the background, also known as silhouetting. This is the digital version of cutting out the image. Clipping paths may be used to add silhouetted images to vector graphics or page layout files that retain vector data. Alpha compositing, allows for soft translucent edges when selecting images. There are a number of ways to silhouette an image with soft edges including selecting the image or its background by sampling similar colors, selecting the edges by raster tracing, or converting a clipping path to a raster selection. Once the image is selected, it may be copied and pasted into another section of the same file, or into a separate file. The selection may also be saved in what is known as an alpha channel.
A popular way to create a composite image like this one is to use transparent layers. In this case, the "background image" shown at left was placed as the bottom layer. The layer marked "Original Image" at left was then added as a second layer in a multi-layer document. Using an image layer mask, all but the girl are hidden from the layer, giving the impression that she has been added to the background layer. Performing a merge in this manner preserves all of the pixel data on both layers to more easily enable future changes (such as adding the second individual) in the new merged image.
[edit] Slicing of images
A more recent tool in digital image editing software is the image slicer. Parts of images for graphical user interfaces or web pages are easily sliced, labeled and saved separately from whole images so the parts can be handled individually by the display medium. This is useful to allow dynamic swapping via interactivity or animating parts of an image in the final presentation.
- See also: Slicing (web design)
[Special effects

An example of some special effects that can be added to a picture.
Image editors usually have a list of special effects that can create unusual results. Images may be skewed and distorted in various ways. Scores of special effects can be applied to an image which include various forms of distortion, artistic effects, geometric and texture effects, and combinations thereof.
Change color depth

An example of converting an image from color to grayscale.
It is possible, using software, to change the
color depth of images. Common color depths are 2, 4, 16, 256, 65.5 thousand and 16.7 million colors. The JPEG and PNG image formats are capable of storing 16.7 million colors (equal to 256 luminance values per color channel). In addition,
grayscale images of 8
bits or less can be created, usually via conversion and down-sampling from a full color image.
Contrast change and brightening

An example of contrast correction. Left side of the image is untouched.
Image editors have provisions to change the
contrast of images and brighten or darken the image. Underexposed images can be often be improved by using this feature. Recent advances have allowed more intelligent exposure correction whereby only pixels below a particular
luminosity threshold are brightened, thereby brightening underexposed shadows without affecting the rest of the image.
Color adjustments

An example of color adjustment using Photoshop

Color retouched photo (cycles every 3 seconds)
The color of images can be altered in a variety of ways. Colors can be faded in and out, and tones can be changed using curves or other tools. The color balance can be improved, which is important if the picture was shot indoors with daylight film, or shot on a camera that with an incorrectly adjusted white balance. Special effects, like sepia and grayscale can be added to an image. In addition, more complicated procedures such as the mixing of color channels are possible using more advanced graphics editors.
The red-eye effect, which occurs when flash photos are taken when the pupil is too widely open (so that light from the flash that passes into the eye through the pupil reflects off the fundus at the back of the eyeball), can also be eliminated at this stage.
Printing

Control printed image by changing ppi. Controlling the print size and quality of digital images requires an understanding of the pixels-per-inch (ppi) variable that is stored in the image file and sometimes used to control the size of the printed image. Within the Image Size dialog (as it is called in Photoshop), the image editor allows the user to manipulate both pixel dimensions and the size of the image on the printed document. These parameters work together to produce a printed image of the desired size and quality. Pixels per inch of the image, pixel per inch of the computer monitor, and dots per inch on the printed document are related, but in use are very different. The Image Size dialog can be used as an image calculator of sorts. For example, a 1600 x 1200 image with a ppi of 200 will produce a printed image of 8 x 6 inches. The same image with a ppi of 400 will produce a printed image of 4 x 3 inches. Change the ppi to 800, and the same image now prints out at 2 x 1.5 inches. All three printed images contain the same data (1600 x 1200 pixels) but the pixels are closer together on the smaller prints, so the smaller images will potentially look sharp when the larger ones do not. The quality of the image will also depend on the capability of the printer.


